Smart Bird Feeder Part 1 - How can I weigh things with a Raspberry Pi? - Using a HX711 ADC and load cell with a Raspberry Pi


There is a very large robin that often visits the bird feeder on my office window. It's clear this robin is much heavier than other robins because when he lands the impact makes a loud thwack sound. I decided to see if I could build a simple setup to figure out exactly how heavy this robin is and in predictable fashion got carried away - this will be the first article in a three part series exploring: building a smart bird feeder than can weigh visiting birds, using AI to identify birds automatically, and bringing it all together with Kafka and Iceberg.
In order to get the weight of birds on my bird feeder I would need to add a load cell to the feeder platform. Whenever I'm building something like this I tend to start with a Raspberry Pi as that's what I'm most familiar with, there's a lot of great guides online on how to use Arduinos and other micro controllers with load cells and amplifiers but there isn't a huge amount out there on Raspberry Pis other than this great tutorial from Tutorials for Raspberry Pi from several years ago. I was able to get a working setup with a cheap 5kg rated load cell and HX711 ADC as explained in the tutorial but I encountered few snags along the way so I thought in addition to documenting my bird feeder project I would write and updated version of the Tutorials for Raspberry Pi guide to help anyone else looking to work with load cells and the Raspberry Pi.
The below guide will talk you through step by step everything you need to do to weigh an object up to 5kg in weight with a Raspberry Pi including selecting components, assembly, and calibration.
What is an HX711?
First though, why do we need an HX711 at all? Load cells convert forces applied to them into analog electrical signals via strain gauges (resistors that change their resistance when bent or stretched) that we can use to measure weight but these signals are both analog and too small to be detected by the Raspberry Pis GPIO (General Purpose Input Output) pins. The HX711 is an ADC (Analog to Digital Convertor) which takes the weak analog signal from the load cell and outputs a digital signal (as a 24bit integer) the Raspberry Pi can read.

Hardware Setup
Setting up your HX711 will require some soldering, don't worry if you've not done soldering before this is a particularly simple soldering job (even I could do it!) If you follow the method I used you'll need to cut and drill some parts to install your load cell - if you'd rather not do this you can buy a load cell and HX711 kit with these parts pre-made, for example this kit with laser cut wooden sheets with mounting holes. If you already have a soldering iron all the parts for this project new should set you back no more than £85 but you could save a fair bit if you pick up the Raspberry Pi second hand (or already have one laying around) and scavenge your bolts and rigid sheets rather than buying them new.
Hardware shopping list
- Raspberry Pi 3 (£35) - or any similarly capable computer with soldered headers for GPIO, you can pick Raspberry Pi 3s now for as little as £10 second hand
- Load cells and HX711s (£8) - a pair of load cells and HX711s, these are cheap as chips and it's nice to have a spare in case you get over enthusiastic tightening bolts or testing later on.
- Bolts and Washers (£8) - the load cell I picked had 4 holes for mounting, two threaded for M2 and two threaded for M3 bolts - this selection of bolts should have everything you need including washers which are useful for making sure the strain gauges don't get pinched. I scavenged the bolts and washers I needed from some other projects.
- Micro SD Card (£10) - These get cheaper all the time, here I've linked to a 128GB card that's relatively good value but really anything over 16GB will be fine as long as you can write to it properly, for more information on picking an appropriate SD card see this great article by Chris Dzombak.
- Micro USB Power Supply (£15) - make sure to pick a reliable power supply that consistently delivers 5V/2.5A, I've linked to the official power supply here but almost any half decent Micro USB power supply will do.
- Acrylic / Plywood-wood sheets approximately 100x200mm (£6)- these will be used to mount your load cell and hold whatever it is you're weighing so anything cheap and rigid will do, I used some old plexiglass offcuts but I suspect even sturdy cardboard would work fine.
- Female to female Dupont cables (£4) - you only need 4 of these to connect your HX711 to the headers on your Raspberry Pi but its worth buying them in a big pack like the one linked as it's much cheaper than only buying 4 and dupont cables are always handy for projects like this.
- Optional: Precision weights (£12) - Can be used to accurately calibrate your load cell but any object that you know the exact weight of will do, a reasonably accurate kitchen scale can come in handy here.
Tools
Essential:
- Soldering iron
- Solder
- Scissors or snips
Handy for shaping your rigid sheets and making mounting holes:
- Dremel
- Coping saw
- File or sanding paper
- Drill
Setup
- Cut your sheets to size and drill two holes in each sheet to attach the load cell and bolt the load cell into place. Your sheets should look something like the diagram below with the holes for mounting the top sheet roughly centered and the hole for mounting the base towards the edge:
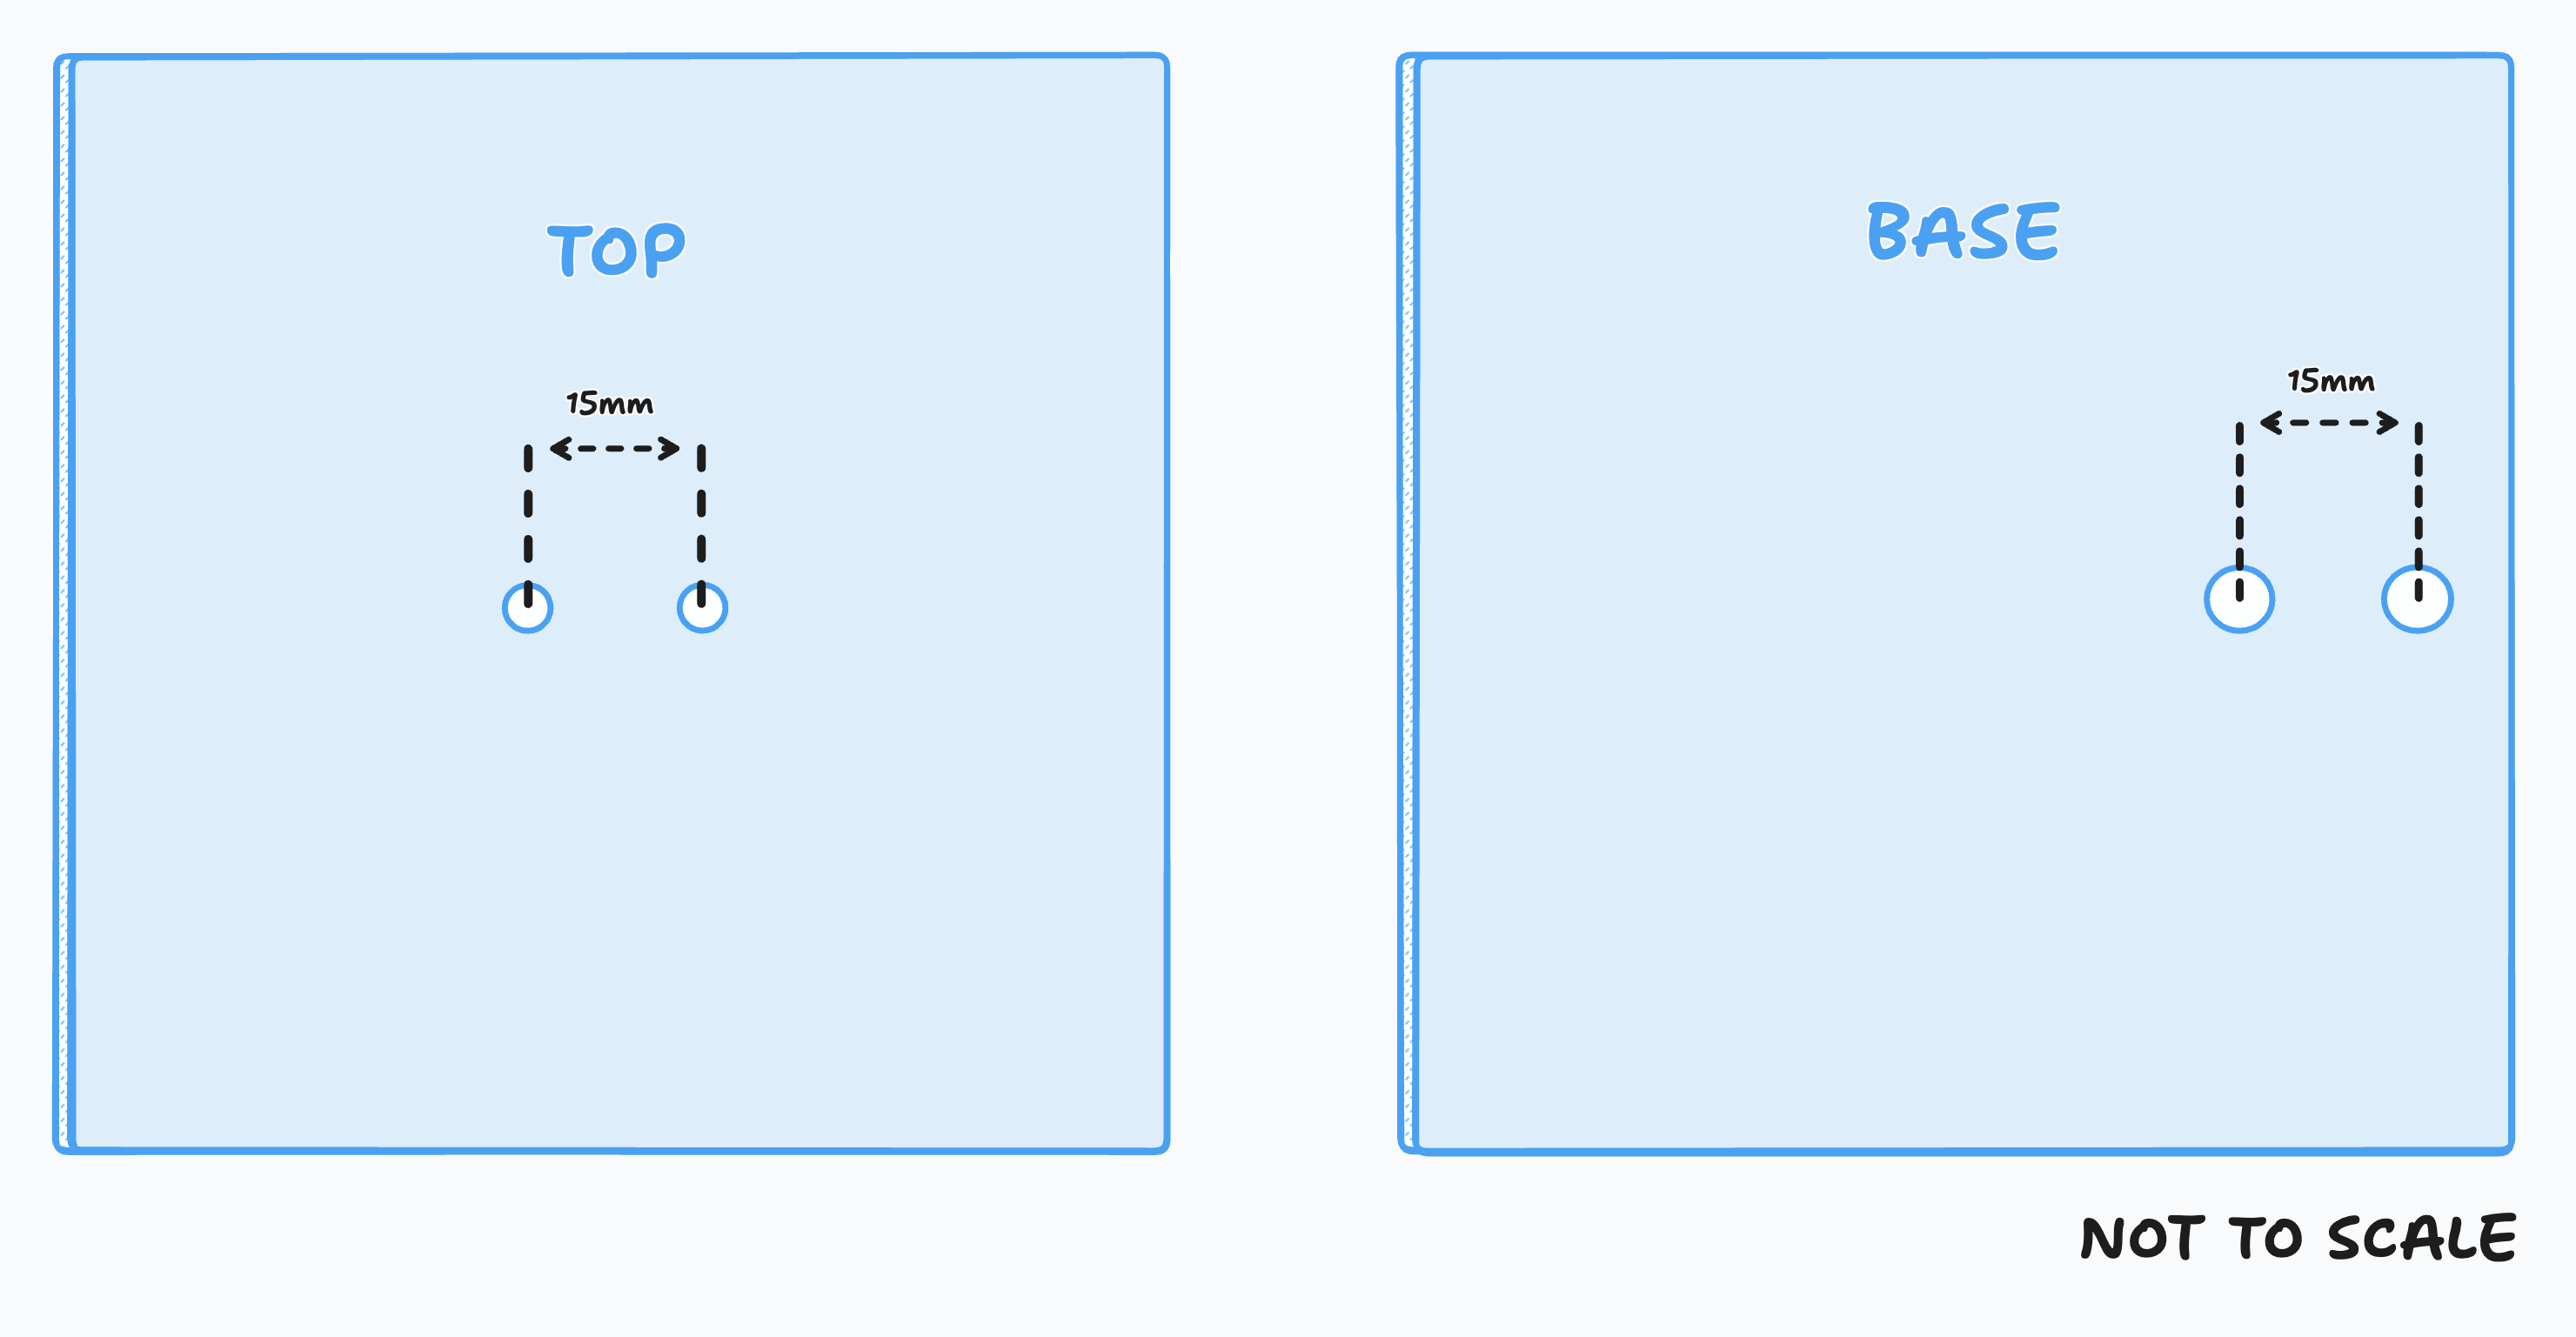
The positioning of the holes is important! We want one end of the load cell to be centered roughly on the middle sheet with the arrow on the end oriented correctly.
- Bolt the load cell into place sandwiched between both rigid sheets as in the diagram below. You may need to add some washers between the load cell and the rigid sheets to stop the strain gauges in the white blob around the middle from getting pinched when weight is added to the top sheet - only the
mounting surfaces of the load cell should make contact with the rigid sheets.
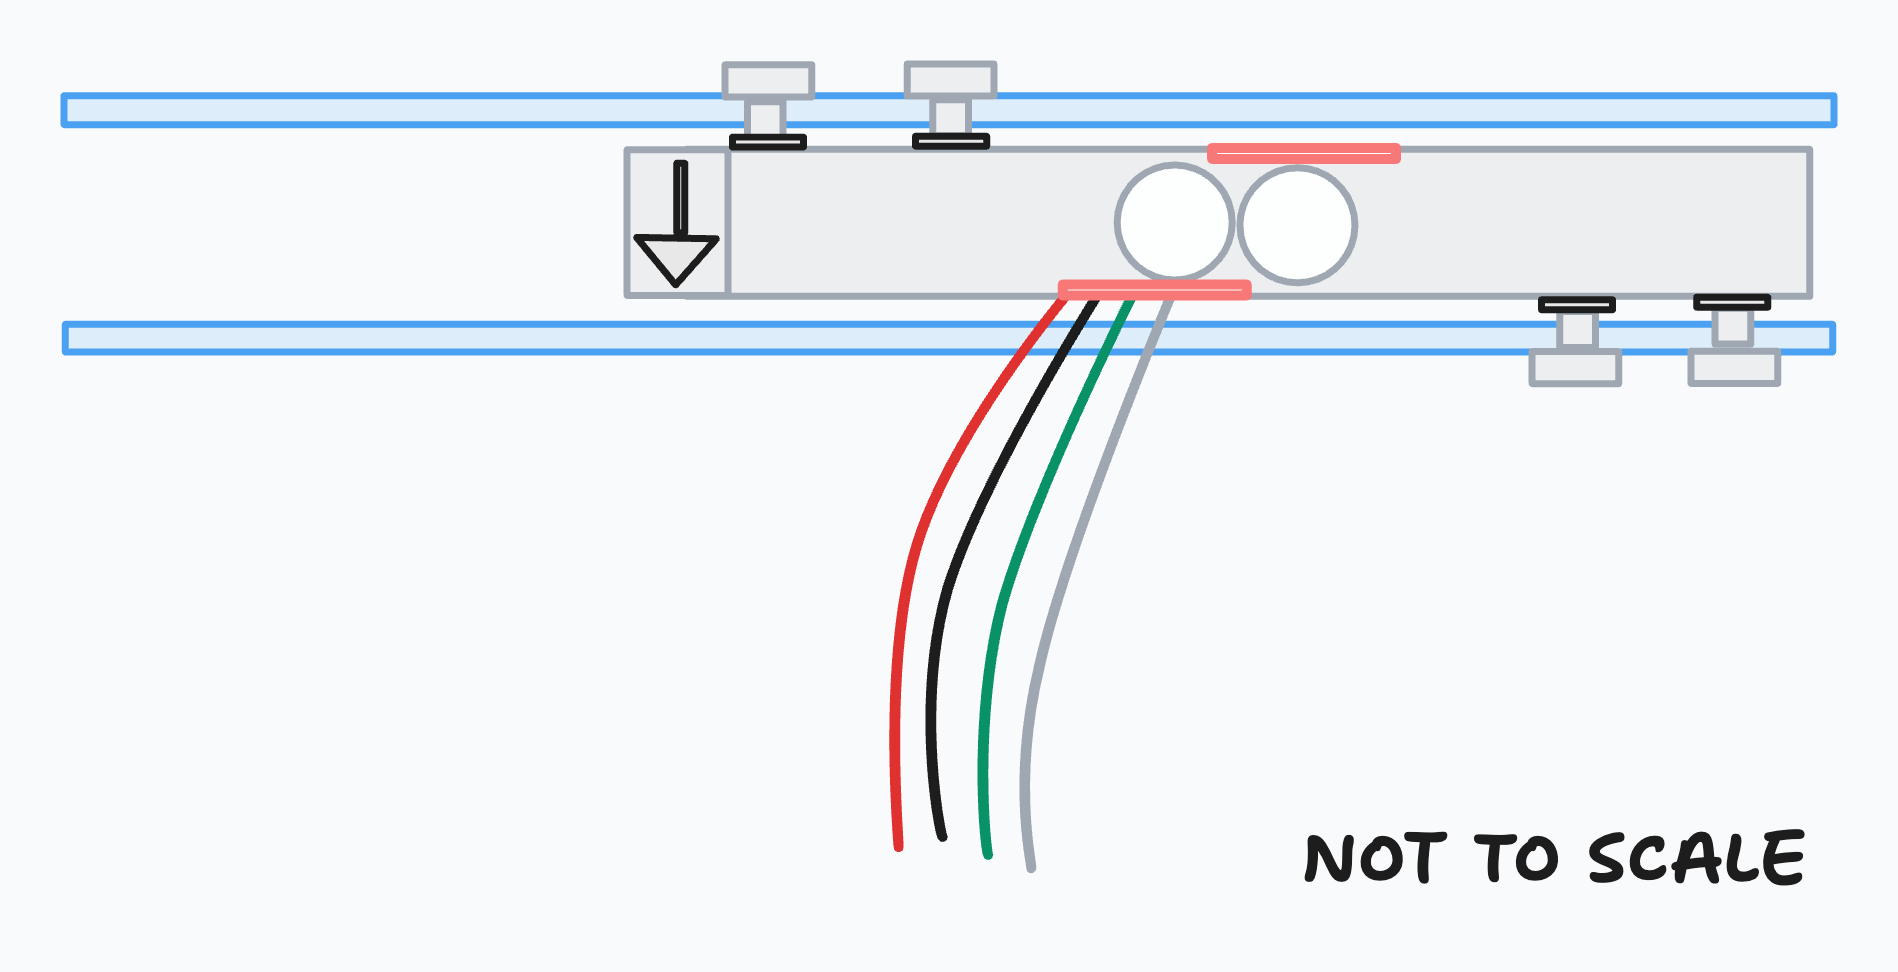
If everything is assembled correctly each of the rigid sheets should be parallel to the load cell, if things are askew or the rigid sheets are resting on the epoxy in the middle of the load cell which covers the strain gauges try adding more washers between the load cell and the rigid sheet to free things up.
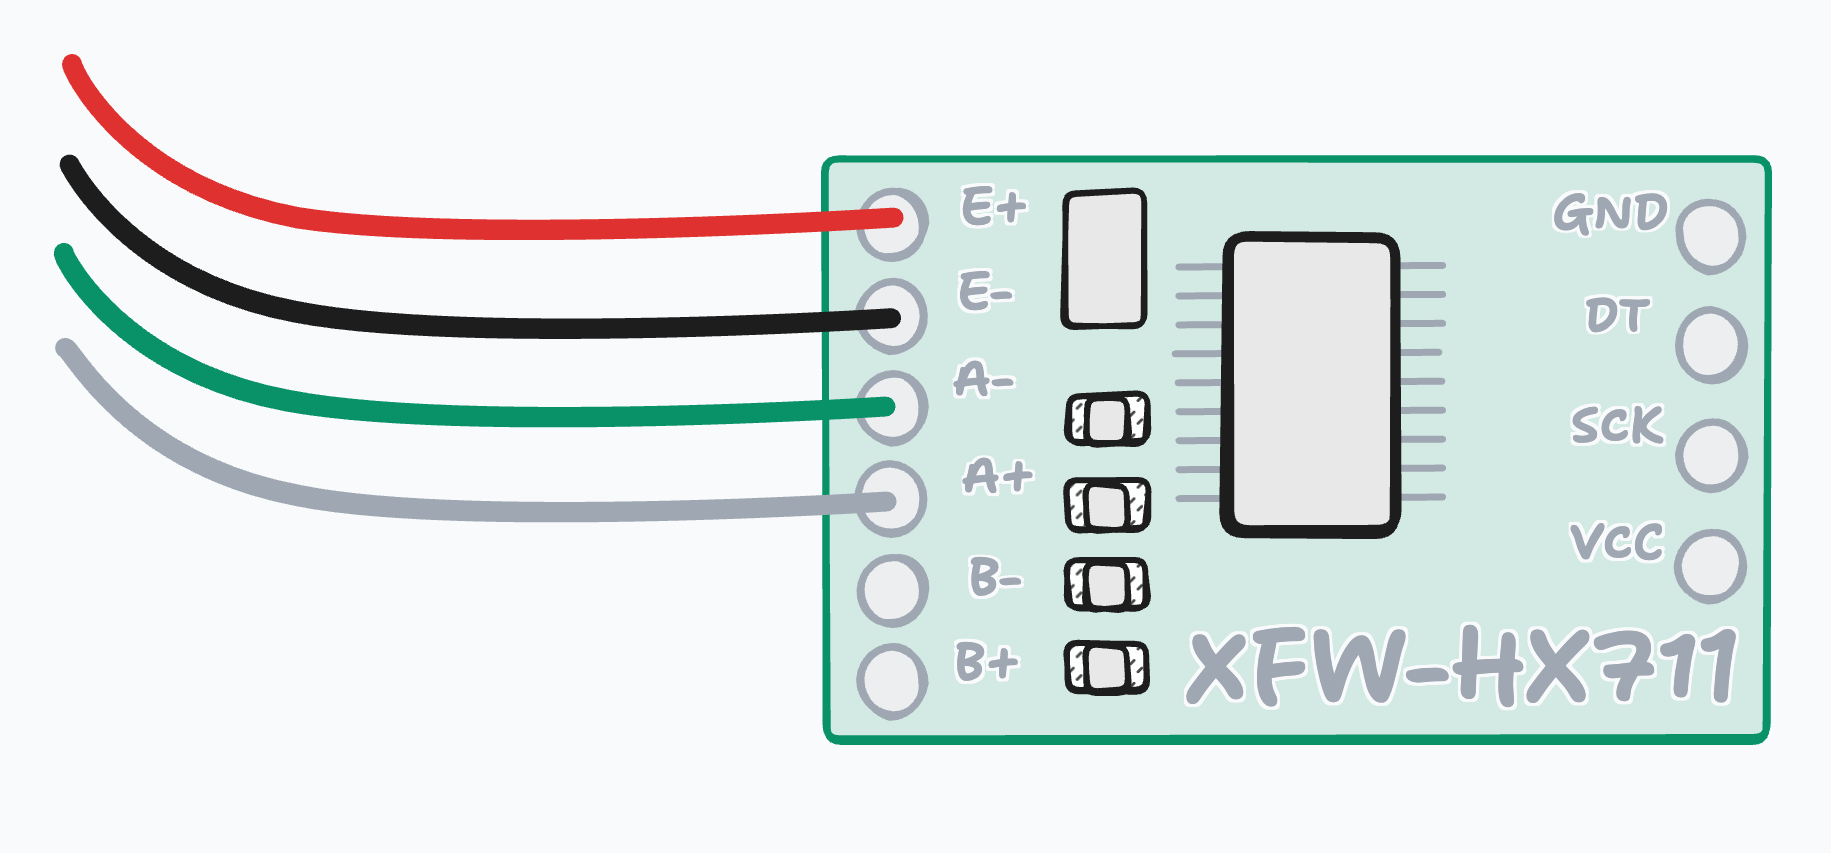
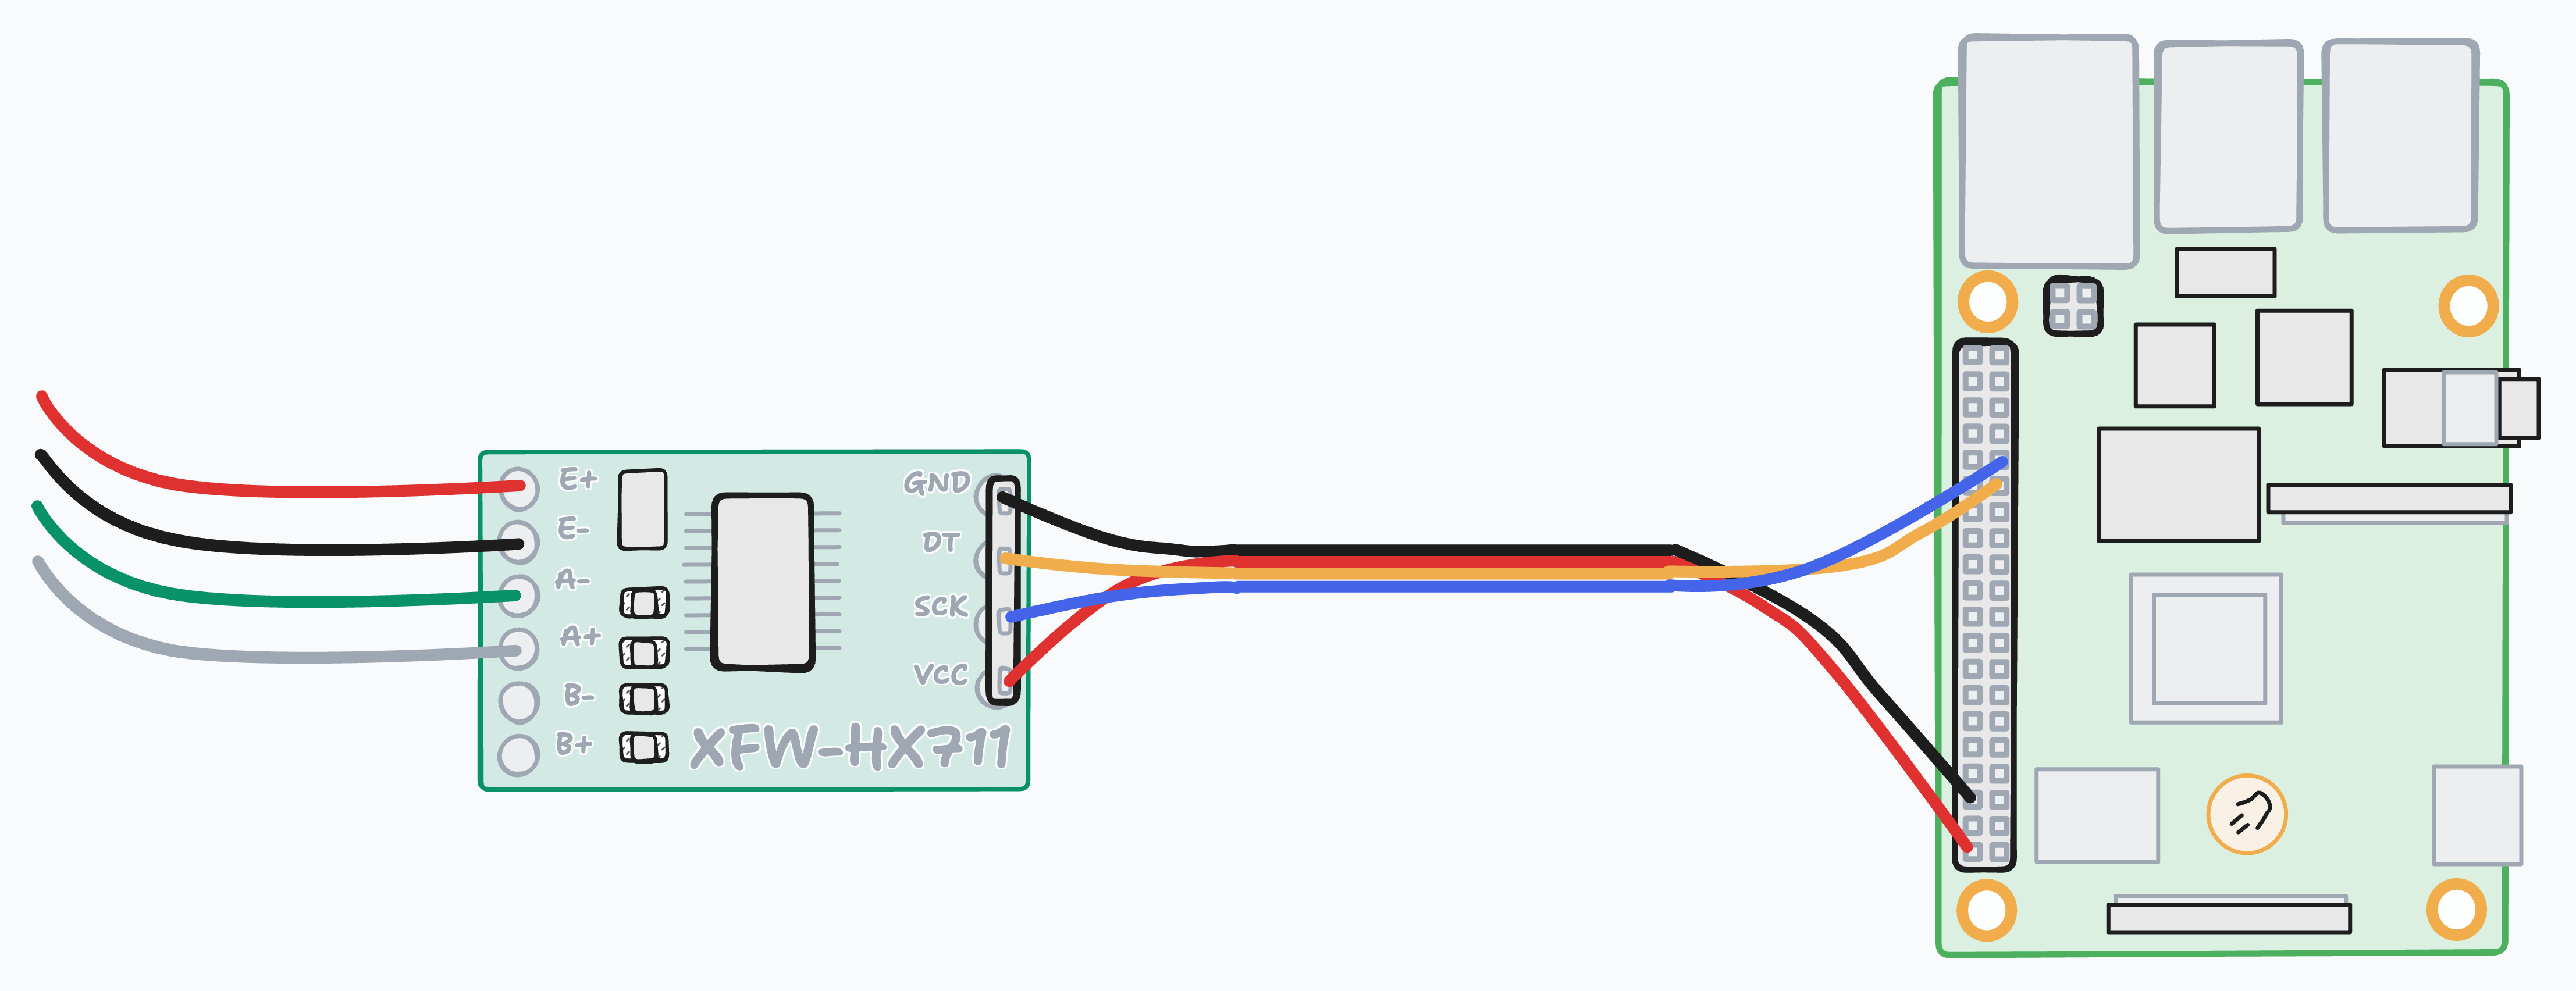
- Solder the leads from the load cell to the correct pads on the HX711 as follows: Red to E+, Black to E-, Green to A-, and White to A+ (the pins labeled B+/B- remain empty).
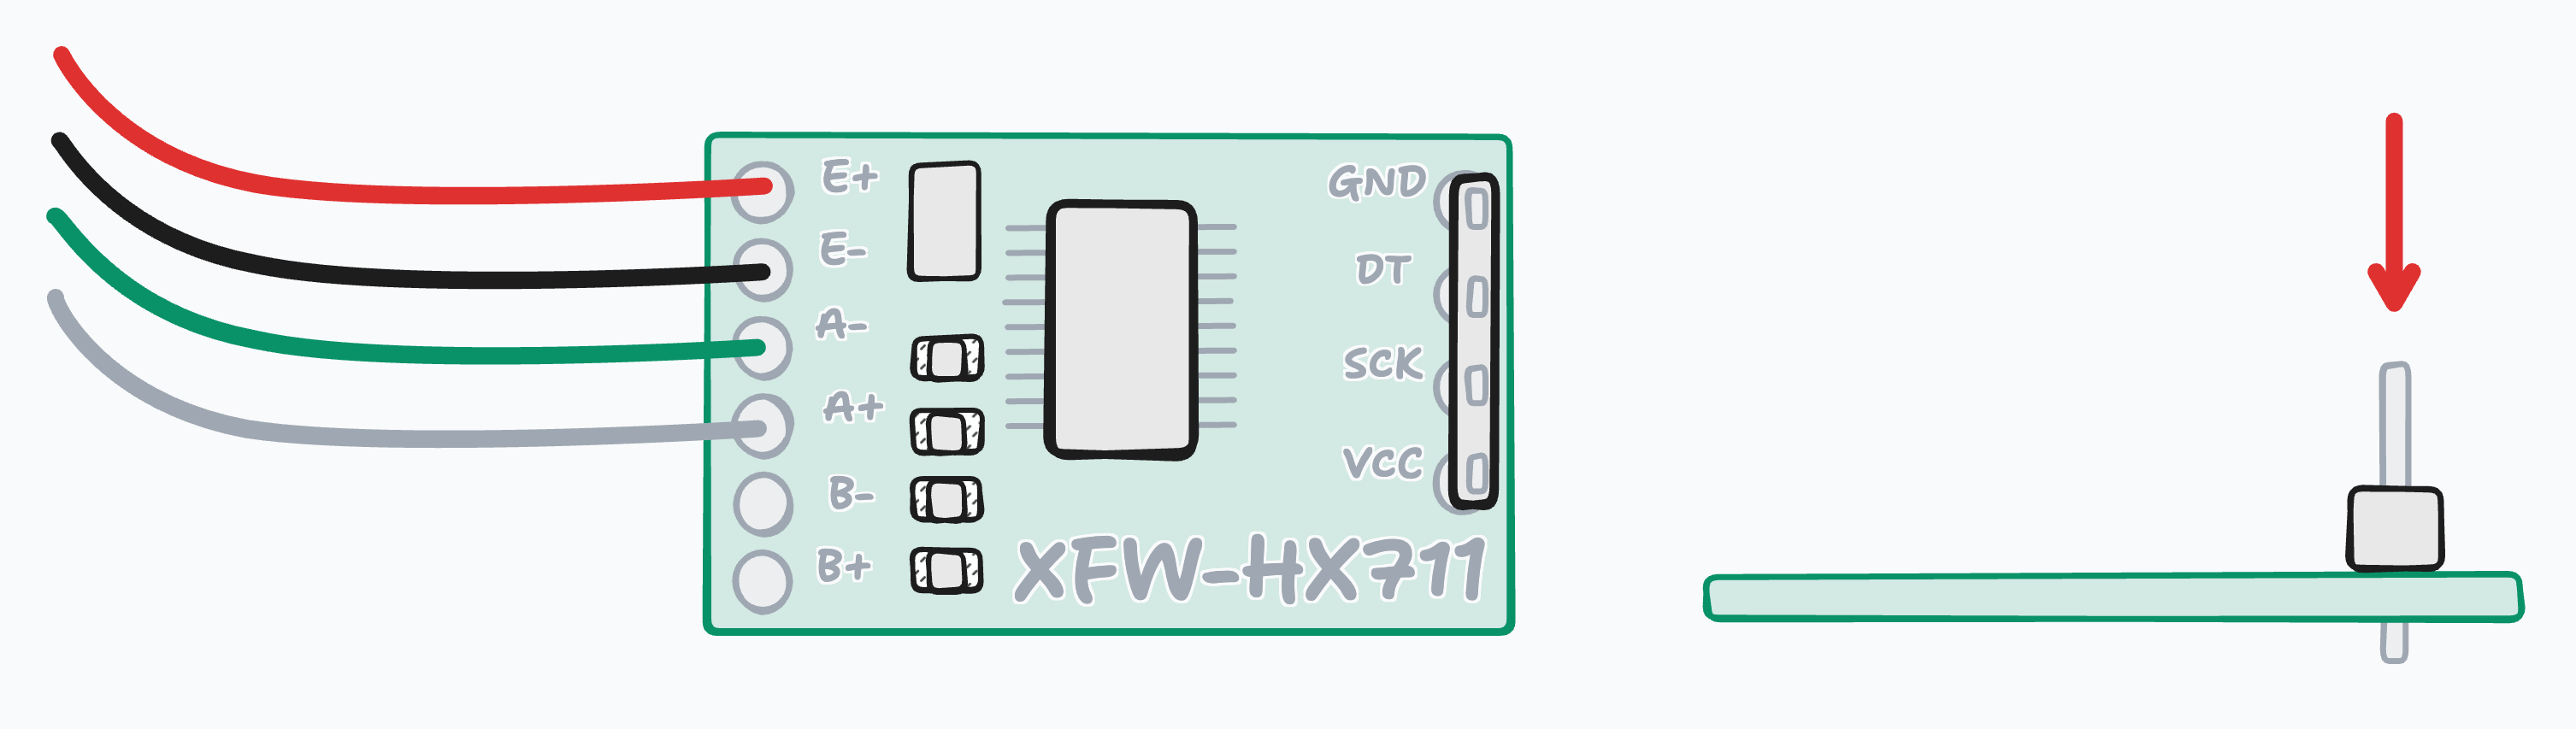
- Cut off a 4 pin long strip of the included headers, press them short end first into the holes in the board marked GND, DT, SCK, and VCC and solder them from the reverse of the board. This can be fiddly! I usually use a big blob of Blu Tack to hold my headers in place when soldering them but anything that can hold the headers square (i.e. a second pair of hands!) can be really helpful here.
- Tear off a strip of four female to female dupont wires, (keeping the four stuck together can help keep your wiring tidy but it can help to tease the ends apart a bit to make it easier to plug them into your headers) and use them to connect the headers on the HX711 to the headers on your Raspberry Pi as follows: VCC to Raspberry Pi Pin 2 (5V),GND to Raspberry Pi Pin 6 (GND), DT to Raspberry Pi Pin 29 (GPIO 5), and SCK to Raspberry Pi Pin 31 (GPIO 6). The pin out of your Raspberry Pi may vary slightly depending on model, for reference check out this awesome resource over on pinout.xyz.
-
Flash your SD card and setup your Raspberry Pi. For instructions on how to do this properly check out this guide on the Raspberry Pi website.
-
Clone the library we need to control the HX711 with Python and navigate into the directory:
git clone https://github.com/tatobari/hx711py
cd hx711py
- Finally, we're ready to calibrate the load cell. Create a script called
calibration.pywith the following code and run it:
import time
import RPi.GPIO as GPIO
from hx711 import HX711

# Setup HX711
hx = HX711(5, 6)
hx.set_reading_format("MSB", "MSB")
hx.set_reference_unit(1)
hx.reset()
hx.tare()

# Configuration
num_samples = 15

print(f"Place known weight on scale and enter it's weight in grams:",end="")
known_weight = int(input())

# Collect samples
print("Collecting samples...")
samples = []
for i in range(num_samples):
    reading = hx.get_weight(1)
    samples.append(reading)
    print(f"{i+1}: {reading}")
    time.sleep(0.2)

# Remove outliers (simple method: remove top and bottom 20%)
samples.sort()
clean_samples = samples[3:-3]  # Remove 3 highest and 3 lowest

# Calculate reference unit
average = sum(clean_samples) / len(clean_samples)
reference_unit = average / known_weight

print(f"\nAverage reading: {average:.1f}")
print(f"Reference unit: {reference_unit:.2f}")
print(f"\nAdd this to your script:")
print(f"hx.set_reference_unit({reference_unit:.2f})")

GPIO.cleanup()
When prompted add one of your calibration weights or your known weight to the top of your scale and enter the weight in grams in the script and hit enter:
Place known weight on scale and enter it's weight in grams:50
Keep a note of the reference unit, calculated as referenceUnit = longValueWithOffset / known_weight where longValueWithOffset is the 24bit integer reading from the HX711 minus the tare value.
Average reading: 20873.4
Reference unit: 417.47

Add this to your script:
hx.set_reference_unit(417.47)
- Remove your test weight from the scale and create a new script with the code below called
scale.py(update the reference unit with the value from the step above).
import time
import RPi.GPIO as GPIO
from hx711 import HX711

# Setup HX711
hx = HX711(5, 6)
hx.set_reading_format("MSB", "MSB")
hx.set_reference_unit(417.47)  # Use your calculated reference unit here
hx.reset()
hx.tare()

print("Scale ready! Place items to weigh...")
print("Press Ctrl+C to exit")

try:
    while True:
        weight = hx.get_weight(3)  # Average of 3 readings
        print(f"Weight: {weight:.1f}g")

        hx.power_down()
        hx.power_up()
        time.sleep(0.5)

except KeyboardInterrupt:
    print("\nExiting...")
    GPIO.cleanup()
Run the script and add the test weight again, you should see it's weight accurately reported in grams.
Quick Troubleshooting
If you are getting incorrect or inconsistent values:
-
Try rerunning the calibration script and increase
num_samplesto 25-30 for better averaging. -
Your setup must be on a solid, level surface: if the bolts on the base plate are preventing it from sitting level try putting something underneath to level things out.
-
There is a known issue with byte ordering across Python versions, try changing
hx.set_reading_format("MSB", "MSB")tohx.set_reading_format("LSB", "MSB")and see if your readings stabilize.
If you aren't getting any readings at all or are only getting negative readings after taring:
-
Check that the connections are solid.
-
Check the load cell wires should connect to the HX711 as follows: Red to E+, Black to E-, Green to A-, and White to A+ (the pins labeled B+/B- remain empty).
-
Check the HX711 wires should connect to the Raspberry Pi as follows: VCC to Raspberry Pi Pin 2 (5V),GND to Raspberry Pi Pin 6 (GND), DT to Raspberry Pi Pin 29 (GPIO 5), and SCK to Raspberry Pi Pin 31 (GPIO 6).
-
Make sure you are using a power supply that is providing adequate power and not causing under voltage issues.
You may already see how our code from the previous section could be extended for a variety of different projects, for example, weighing our heavy robin! Instead of bolting my load cell between two rigid sheets I attached it to the bottom of the seed tray in my bird feeder (which has a handy removable tray which makes adding the load cell a breeze) and to a rigid sheet fitted into the frame of the bird feeder so that I can weigh birds when they land.
Let's create a final script called weigh_bird.py with the following code:
import time
from datetime import datetime
import sys
import RPi.GPIO as GPIO
from hx711 import HX711

bird_present = False

BIRD_THRESHOLD = 5 # Lightest british songbird Goldcrest 5g

def cleanAndExit():
    print("Cleaning...")

    print("Bye!")
    sys.exit()

hx = HX711(5, 6)


hx.set_reading_format("MSB", "MSB")

referenceUnit = 416.71
hx.set_reference_unit(referenceUnit)

hx.reset()

hx.tare()

print("Tare done! Waiting for birds...")

def bird_landed(weight):
    """Called when a bird lands on the feeder"""
    print(f"🐦 Bird landed at {current_time.isoformat()}! Weight: {weight:.2f}g")

def bird_left():
    """Called when a bird leaves the feeder"""
    print(f"🦅 Bird left!")
    time.sleep(2)
    print("Tare done! Waiting for birds...")
    hx.tare()

while True:
    try:
        current_weight = hx.get_weight(5)
        current_time = datetime.now()

        if not bird_present and current_weight > BIRD_THRESHOLD:
            bird_present=True
            bird_landed(current_weight)

        elif bird_present and current_weight < BIRD_THRESHOLD:
            bird_present=False
            bird_left()

        hx.power_down()
        hx.power_up()
        time.sleep(0.1)

    except (KeyboardInterrupt, SystemExit):
        cleanAndExit()
Run the above code and now every time a bird lands on the feeder (or you add a small weight) the script outputs its weight like so:
hugh@bird:~/bird-kafka-demo/bird_weights $ python3 bird_weights.py
Tare done! Waiting for birds...
🐦 Bird landed at 2025-07-07T22:55:03.468192! Weight: 9.08g
🦅 Bird left!
Tare done! Waiting for birds...
🐦 Bird landed at 2025-07-07T22:55:28.768343! Weight: 59.71g
🦅 Bird left!
Tare done! Waiting for birds...
🐦 Bird landed at 2025-07-07T22:55:35.926844! Weight: 52.20g
🦅 Bird left!
Tare done! Waiting for birds...
Among some other new features we've added like a variable to keep track of if a bird is on the feeder or not to avoid reporting the weight of the same bird multiple times also note that we now tare the scale shortly after the bird takes off. Adding a scale to a bird feeder presents a unique challenge, accounting for bird seed! We re-tare the scale after the bird takes off to avoid eaten bird seed causing the weight of subsequent birds to be under reported.
Conclusion and Next Steps
You should now have a working Raspberry Pi powered scale which can be used to accurately weigh things and hopefully some ideas about how you can use it to build your own projects. If you build something using this guide please let me know, I'd love to see what you come up with! If I were to build this project over I would try and reinforce the delicate cables connecting the load cell to the HX711, I tore these a couple of times and had to resolder them, I think maybe wrapping them in heat shrink or putting a blob of hot glue over the solder joints could help with this.
Whilst this project goes someway to helping me figure out just how heavy my visiting robin is it doesn't actually give me any information about what kind of birds are visiting: just how much they weigh. If the robin visits whilst I'm away I won't know if it was him or just some other slovenly bird. To help solve this problem in future I'd like to explore using a webcam and an image classifier to identify the species of bird visiting my feeder.