From Radio Waves to Kafka Topics - Building a Real-Time Aircraft Data Pipeline


If you want to showcase real-time data architectures you need a data source that's live, high-volume, varied, and messy enough to showcase real-world challenges. This is an issue I've run into several times over the last year whilst giving talks about real-time analytics using Kafka, Druid, ClickHouse, and Grafana in various combinations. You could use a data generator like ShadowTraffic but when trying to bring the sometimes dry topic of data engineering to life nothing beats real data. So when I'm building demos I've consistently turned to the same compelling dataset: ADS-B aircraft transmissions.
I was introduced to ADS-B (Automatic Dependent Surveillance–Broadcast) by my former colleague at Imply Hellmar Becker, and is one of the technologies aircraft use to relay data including their position, heading, and speed to air traffic controllers and to other aircraft. This creates a continuous stream of real-time data that's publicly accessible and rich with analytical possibilities. The dataset perfectly illustrates the complexities of streaming analytics—it arrives at high velocity, contains mixed data types, requires deduplication and enrichment, and benefits from both real-time alerting and historical analysis.
What makes ADS-B particularly valuable for demonstrations is its combination of technical complexity and intuitive appeal. Everyone understands aircraft movement, making it easy to visualize concepts like windowing, aggregation, and anomaly detection. Yet underneath this accessibility lies genuine engineering challenges: handling bursty traffic patterns, dealing with incomplete or duplicate messages, and correlating position data with aircraft metadata.
In this article, I'll walk through building a complete ADS-B ingestion pipeline—from setting up a simple antenna to producing clean, structured data to Kafka topics ready for real-time analysis. By the end, you'll have both the technical foundation and a rich dataset to explore your own streaming analytics architectures.
Understanding ADS-B Data

ADS-B transmissions use a standardized message format called SBS (BaseStation format), which arrives as comma-separated text lines. Each message contains different types of aircraft information, for example:
Position Messages (MSG,3): Location, altitude, and identification data
MSG,3,1,1,40756A,1,2025/06/01,17:42:30.733,2025/06/01,17:42:30.776,,35000,,,40.1234,-74.5678,,,0,0,0,0
Velocity Messages (MSG,4): Speed, heading, and vertical rate
MSG,4,1,1,40756A,1,2025/06/01,17:42:31.233,2025/06/01,17:42:31.276,,,450,275,,,256,,,,,0
ADS-B data has a high data velocity with anywhere from 100 to 2000 messages a second produced by a receiver depending on location. There are some problems with ADS-B data that present a barrier to real time analytics with this data: the data contains duplicate messages because the same aircraft can be tracked by multiple receivers (as many as 20-30% of messages will be duplicates), the are missing fields because not all messages contain complete information, and traffic varies by time of day and geographic location.
This real-world messiness makes ADS-B data perfect for demonstrating streaming analytics challenges like de-duplication, windowing, and real-time aggregation.
Hardware Setup and Data Collection
You can be receiving live ADS-B data for around £95 (or less, if you already have some of these parts or can pick them up second hand) and have it running in 15 minutes. Here's my exact setup that's been reliably collecting ADS-B data for months.
Hardware shopping list
- Raspberry Pi 3 (£35) - or any similarly capable computer, you can pick Raspberry Pi 3s now for as little as £18 second hand
- NooElec NESDR Mini USB RTL-SDR (£35) - An easy to use and readily available ADS-B antenna that can be connected to your Pi via USB. The included antenna gets you 50-100km range, which is perfect for getting started.
- Micro SD Card (£10) - These get cheaper all the time, here I've linked to a 128GB card that's relatively good value but really anything over 16GB will be fine as long as you can write to it properly, for more information on picking an appropriate SD card see this great article by Chris Dzombak.
- Micro USB Power Supply (£15) - make sure to pick a reliable power supply that consistently delivers 5V/2.5A, I've linked to the official power supply here but almost any half decent Micro USB power supply will do.
Setup
-
Install a supported OS on your Pi, I'm using a lite version (without a UI) of the official Debian Bookworm build, for details on how to do this follow the steps in the guide on the Raspberry Pi website.
-
Install Docker on your Pi and add your user to the docker group to run docker without sudo. Important: Log out and back in for group changes to take effect.
curl -sSL https://get.docker.com | sh
sudo usermod -aG docker pi
# Log out and back in for group changes to take effect
- Create a new Docker compose called
docker-compose.ymland define an ultrafeeder services as below. Note: this is a very basic ultrafeeder configuration, you may wish to consult the setup guide in the ADS-B Ultrafeeder repo for a more in depth guide to setting up this part.
services:
  ultrafeeder:
    image: ghcr.io/sdr-enthusiasts/docker-adsb-ultrafeeder
    container_name: ultrafeeder
    restart: unless-stopped
    device_cgroup_rules:
      - "c 189:* rwm"
    ports:
      - 8080:80     # Web interface
      - 30003:30003 # SBS output (for Kafka)
    environment:
      - READSB_DEVICE_TYPE=rtlsdr
      - READSB_RTLSDR_DEVICE=00000001  # Usually 00000001
      - READSB_LAT=51.4074             # Your antenna latitude
      - READSB_LON=-0.1278             # Your antenna longitude
      - READSB_ALT=52                  # The altitude of your antenna
    volumes:
      - /dev/bus/usb:/dev/bus/usb
- Deploy your ultrafeeder services:
docker-compose up -d
- Optional: Add FlightRadar24 Integration
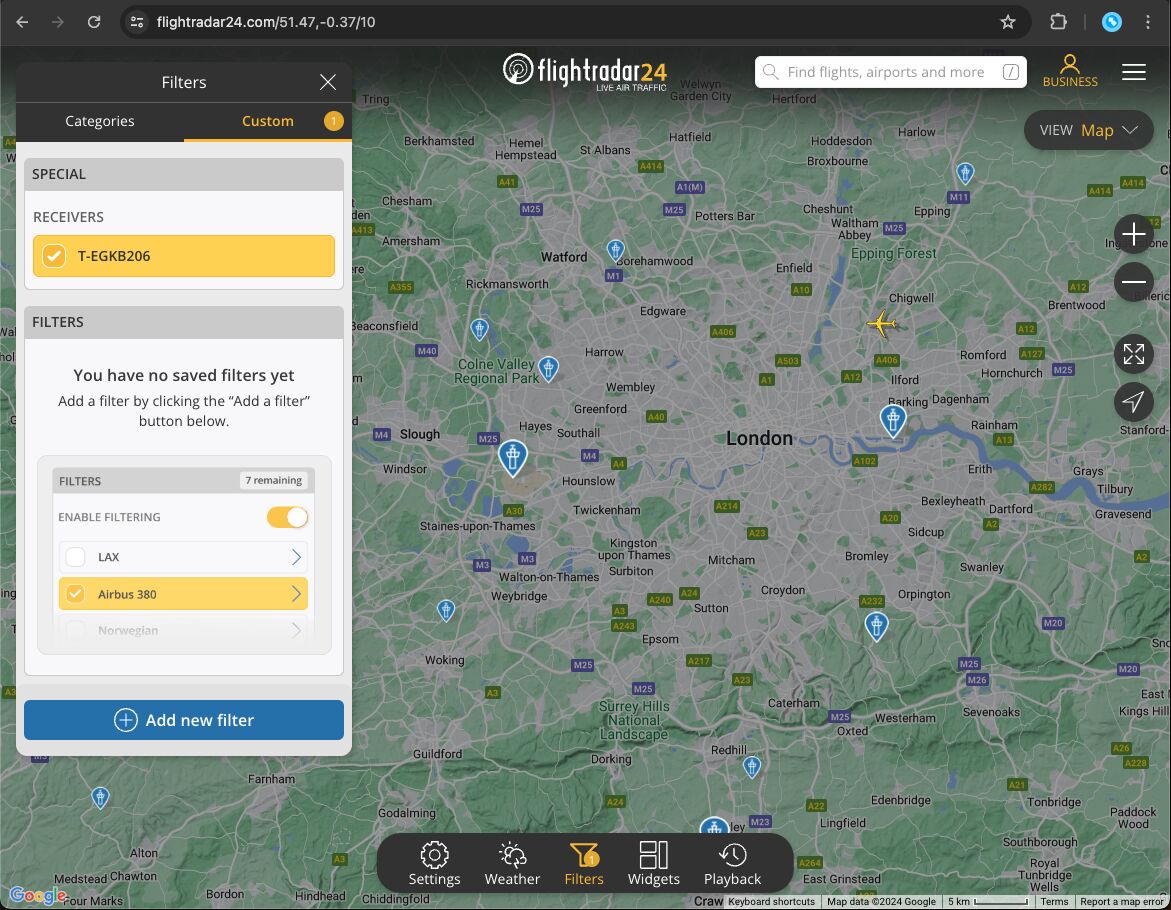
Adding FR24 gives you two immediate benefits: a professional flight tracking interface and confirmation that your data quality meets commercial standards. Plus, contributing data gets you free access to FR24's premium features. Register via the flight radar site to get your sharing key, you should then be able to find your key in your Account Settings under "My data sharing".
Add the flight radar feed service to your docker compose to start sending data to FR24.
# Add to existing services
  fr24feed:
    image: ghcr.io/sdr-enthusiasts/docker-flightradar24:latest
    container_name: fr24feed
    restart: always
    ports:
      - 8754:8754
    environment:
      - BEASTHOST=ultrafeeder
      - FR24KEY={your flight radar 24 key}
    dns_search: . # prevents rare connection issues related to a bug in docker and fr24feed
Redeploy with:
docker-compose up -d
Once setup your station should appear on their coverage map within 10-15 minutes.
- Validate ADS-B Data Reception
Test that you are receiving ADS-B data correctly:
nc localhost 30003
You should see continuous messages like:
MSG,8,1,1,40756A,1,2025/06/01,17:42:30.733,2025/06/01,17:42:30.776,,,,,,,,,,,,0
MSG,3,1,1,40756A,1,2025/06/01,17:42:33.003,2025/06/01,17:42:33.015,,35000,,,40.1234,-74.5678,,,0,0,0,0
MSG,4,1,1,40756A,1,2025/06/01,17:42:35.120,2025/06/01,17:42:35.156,,,450,275,,,256,,,,,0
If your antenna has a good view of the sky you can expect around 100-2000 messages/second (depending on your location) with CPU usage sitting comfortably under 20% on a Pi 3.
Quick Troubleshooting
No aircraft? Check your antenna USB connection:
lsusb | grep RTL
You should see something like:
Bus 001 Device 033: ID 0bda:2838 Realtek Semiconductor Corp. RTL2838 DVB-T
If not, your antenna may not be connected correctly. Verify your antenna connection is secure or try different USB port (preferably USB 2.0+) and try restarting ultrafeeder:
docker-compose down && docker-compose up -d
Tracking very few aircraft? Try placing your antenna higher and away from electronics, for best results try and get an unobstructed view of the sky.
Kafka Integration
Now that we have ADS-B data streaming on port 30003 let's produce it to Kafka to allow us to work with it as an event stream. We'll add Kafka to our Docker stack and build a producer that can handle thousands of aircraft updates per second.
Deploy Kafka
- First, let's extend your existing docker-compose.yml with Kafka services. Deploying Kafka alongside ultrafeeder on your Pi helps to keep networking simple but if you want to produce data from multiple receivers you may find it more practical to deploy Kafka elsewhere like on a secondary Pi or in a managed Kafka cluster in the Cloud (check out this awesome guide by Robin Moffat on different configurations of Kafka and its associated producers and consumers). Add the following to your services section:
# Add to existing services
  broker:
    image: apache/kafka:latest
    hostname: broker
    container_name: broker
    ports:
      - 9092:9092     # Expose external SASL port
    volumes:
      - ./kafka-config/kafka_server_jaas.conf:/etc/kafka/kafka_server_jaas.conf
    environment:
      KAFKA_BROKER_ID: 1
      # Map listener names to security protocols
      KAFKA_LISTENER_SECURITY_PROTOCOL_MAP: INTERNAL:SASL_PLAINTEXT,EXTERNAL:SASL_PLAINTEXT,CONTROLLER:PLAINTEXT
      # Define what addresses to advertise to clients
      KAFKA_ADVERTISED_LISTENERS: INTERNAL://broker:29092,EXTERNAL://localhost:9092
      # Basic Kafka configs
      KAFKA_OFFSETS_TOPIC_REPLICATION_FACTOR: 1
      KAFKA_GROUP_INITIAL_REBALANCE_DELAY_MS: 0
      KAFKA_TRANSACTION_STATE_LOG_MIN_ISR: 1
      KAFKA_TRANSACTION_STATE_LOG_REPLICATION_FACTOR: 1
      # KRaft mode settings
      KAFKA_PROCESS_ROLES: broker,controller
      KAFKA_NODE_ID: 1
      KAFKA_CONTROLLER_QUORUM_VOTERS: 1@broker:29093
      # Define interfaces and ports to listen on
      KAFKA_LISTENERS: INTERNAL://0.0.0.0:29092,EXTERNAL://0.0.0.0:9092,CONTROLLER://broker:29093
      # Internal communication between brokers (if you had multiple)
      KAFKA_INTER_BROKER_LISTENER_NAME: INTERNAL
      KAFKA_CONTROLLER_LISTENER_NAMES: CONTROLLER
      KAFKA_LOG_DIRS: /tmp/kraft-combined-logs
      CLUSTER_ID: MkU3OEVBNTcwNTJENDM2Qk
      # SASL configuration
      KAFKA_SASL_ENABLED_MECHANISMS: PLAIN
      KAFKA_SASL_MECHANISM_INTER_BROKER_PROTOCOL: PLAIN
      KAFKA_ALLOW_EVERYONE_IF_NO_ACL_FOUND: "true"
      KAFKA_OPTS: "-Djava.security.auth.login.config=/etc/kafka/kafka_server_jaas.conf"
The above configuration supports producers within the same docker network and consumers outside of the network to allow for flexibility adding services later on.
  # Map listener names to security protocols
  KAFKA_LISTENER_SECURITY_PROTOCOL_MAP: INTERNAL:SASL_PLAINTEXT,EXTERNAL:SASL_PLAINTEXT,CONTROLLER:PLAINTEXT
  # Define what addresses to advertise to clients
  KAFKA_ADVERTISED_LISTENERS: INTERNAL://broker:29092,EXTERNAL://localhost:9092
All the default are set to keep the Kafka broker as small as possible with no data replication.
  KAFKA_OFFSETS_TOPIC_REPLICATION_FACTOR: 1
  KAFKA_GROUP_INITIAL_REBALANCE_DELAY_MS: 0
  KAFKA_TRANSACTION_STATE_LOG_MIN_ISR: 1
  KAFKA_TRANSACTION_STATE_LOG_REPLICATION_FACTOR: 1
We will also enable some basic auth. More on that in the next step.
  KAFKA_SASL_ENABLED_MECHANISMS: PLAIN
  KAFKA_SASL_MECHANISM_INTER_BROKER_PROTOCOL: PLAIN
  KAFKA_ALLOW_EVERYONE_IF_NO_ACL_FOUND: "true"
  KAFKA_OPTS: "-Djava.security.auth.login.config=/etc/kafka/kafka_server_jaas.conf"
- Before we deploy our Kafka cluster let's set up our basic authentication. Whilst the ADS-B data we are producing is publicly available some basic auth will help protect your topic from 3rd parties modifying your data should you choose to make your broker publicly accessible over the network, for example: if you want to support multiple receivers on your home network producing to your topic. Create the directory structure:
mkdir -p kafka-config
- Create
kafka-config/kafka_server_jaas.confand configure a username and password (enter your own values instead of the defaults below!) both for server access and for client access:
KafkaServer {
   org.apache.kafka.common.security.plain.PlainLoginModule required
   username="admin"
   password="admin-secret"
   user_admin="admin-secret"
   user_producer="producer-secret"
   user_consumer="consumer-secret";
};

KafkaClient {
   org.apache.kafka.common.security.plain.PlainLoginModule required
   username="admin"
   password="admin-secret";
};
- Redeploy with:
docker-compose up -d
Creating the ADS-B Producer
Next we'll build a producer that listens to the ADS-B data on port 30003 and produces it to a topic in our Kafka broker.
- Create the producer directory:
mkdir -p adsb-connector && cd adsb-connector
- Download the connector script. This script will handle writing your ADS-B data to the
adsb-rawtopic in Kafka as well as some quality of life features like ensuring the topic exists before producing, handling logging, and parsing ADS-B data:
curl -o connector.py https://raw.githubusercontent.com/hevansDev/olap-demo/main/receiver/adsb-connector/connector.py
Before moving on, take a look at this section in particular, here we're handling building the actual structure of the Kafka message. If you wanted to write each of the fields in the ADS-B data to separate headers instead of as the raw message you could use something like parts = message.strip().split(',') to parse the CSV and then assign each part to a header like 'header': parts[index].
def send_message(producer, message):
    """Send a message to Kafka with proper error handling"""

    msg_data = {
        'timestamp': datetime.datetime.now().isoformat(),
        'raw_message': message
    }
- Create .env file in the adsb-connector directory to store your producer username and password and Kafka broker details (again update the placeholder values with your username and password from the previous section):
cat > .env << EOF
SBS_HOST=ultrafeeder
SBS_PORT=30003
KAFKA_BROKER=broker:29092
KAFKA_PRODUCER_USERNAME=producer
KAFKA_PRODUCER_PASSWORD=producer-secret
TOPIC_NAME=adsb-raw
EOF
- Return to your main directory:
cd ..
- Add the producer service to your docker-compose.yml:
# Add to existing services
  adsb-kafka-connector:
    image: python:3.9
    container_name: adsb-kafka-connector
    restart: unless-stopped
    depends_on:
      - broker
      - ultrafeeder
    volumes:
      - ./adsb-connector:/app
    working_dir: /app
    environment:
      - KAFKA_BROKER=broker:29092
      - KAFKA_PRODUCER_USERNAME=producer
      - KAFKA_PRODUCER_PASSWORD=producer-secret
      - TOPIC_NAME=adsb-raw
    command: sh -c "apt-get update && apt-get install -y librdkafka-dev && pip install confluent-kafka python-dotenv && python connector.py"
- Deploy your new producer and check all the services are running:
docker-compose up -d
docker ps
Expected output:
CONTAINER ID   IMAGE                                          COMMAND                  CREATED         STATUS         PORTS                                                  NAMES
a1b2c3d4e5f6   ghcr.io/sdr-enthusiasts/docker-adsb-ultrafeeder   "/init"                  2 minutes ago   Up 2 minutes   0.0.0.0:8080->80/tcp, 0.0.0.0:30003->30003/tcp       ultrafeeder
b2c3d4e5f6a7   ghcr.io/sdr-enthusiasts/docker-flightradar24      "/init"                  2 minutes ago   Up 2 minutes   0.0.0.0:8754->8754/tcp                                fr24feed
c3d4e5f6a7b8   apache/kafka:latest                                "/etc/confluent/dock…"   1 minute ago    Up 1 minute    0.0.0.0:9092->9092/tcp                                broker
d4e5f6a7b8c9   python:3.9                                         "sh -c 'apt-get upd…"   1 minute ago    Up 1 minute                                                           adsb-kafka-connector
- Verify Kafka Integration
Connect to the broker container and verify the setup:
docker exec -it broker bash
Create consumer config with credentials:
cat > consumer.properties << EOF
security.protocol=SASL_PLAINTEXT
sasl.mechanism=PLAIN
sasl.jaas.config=org.apache.kafka.common.security.plain.PlainLoginModule required username="consumer" password="consumer-secret";
EOF
Test consuming messages:
kafka-console-consumer \
  --bootstrap-server localhost:29092 \
  --topic adsb-raw \
  --from-beginning \
  --consumer.config /etc/kafka/consumer.properties
You should see JSON messages like:
{"timestamp": "2025-06-01T17:42:30.733Z", "raw_message": "MSG,3,1,1,40756A,1,2025/06/01,17:42:30.733,2025/06/01,17:42:30.776,,35000,,,40.1234,-74.5678,,,0,0,0,0"}
{"timestamp": "2025-06-01T17:42:31.233Z", "raw_message": "MSG,4,1,1,40756A,1,2025/06/01,17:42:31.233,2025/06/01,17:42:31.276,,,450,275,,,256,,,,,0"}
Press Ctrl+C to exit the consumer and exit to leave the broker container.
Quick Troubleshooting
Not seeing any messages in Kafka? Triple check the values of your secrets both in your .env file and in consumer.properties, these must match for either the initial production or the test consumer to work.
No aircraft detected?
Check your antenna USB connection:
lsusb | grep RTL
Expected output:
Bus 001 Device 033: ID 0bda:2838 Realtek Semiconductor Corp. RTL2838 DVB-T
If the device isn't showing up, verify the USB connection is secure, try a different USB port (preferably USB 2.0+), and restart ultrafeeder with:
docker-compose down && docker-compose up -d
Device detected but ultrafeeder shows "no supported devices found"?
Kernel 6.12+ has known issues with RTL-SDR USB support. Conflicting DVB-TV drivers claim the device before RTL-SDR drivers can access it.
Solution: Blacklist the DVB drivers
Create a blacklist configuration file:
sudo nano /etc/modprobe.d/blacklist-rtl.conf
Add these lines:
blacklist dvb_usb_rtl28xxu
blacklist rtl2832
blacklist rtl2830
Save the file (Ctrl+X, then Y, then Enter) and reboot the Pi:
sudo reboot
Verify the fix and test the RTL-SDR directly with:
rtl_test
Expected output:
Found 1 device(s):
  0:  Realtek, RTL2838UHIDIR, SN: 00000001

Using device 0: Generic RTL2832U OEM
Found Rafael Micro R820T tuner
Press Ctrl+C to stop the test.
Check the ultrafeeder logs:
docker logs --tail 20 ultrafeeder
They should contain:
rtlsdr: using device #0: Generic RTL2832U OEM (Realtek, RTL2838UHIDIR, SN 00000001)
Found Rafael Micro R820T tuner
Conclusion and Next Steps
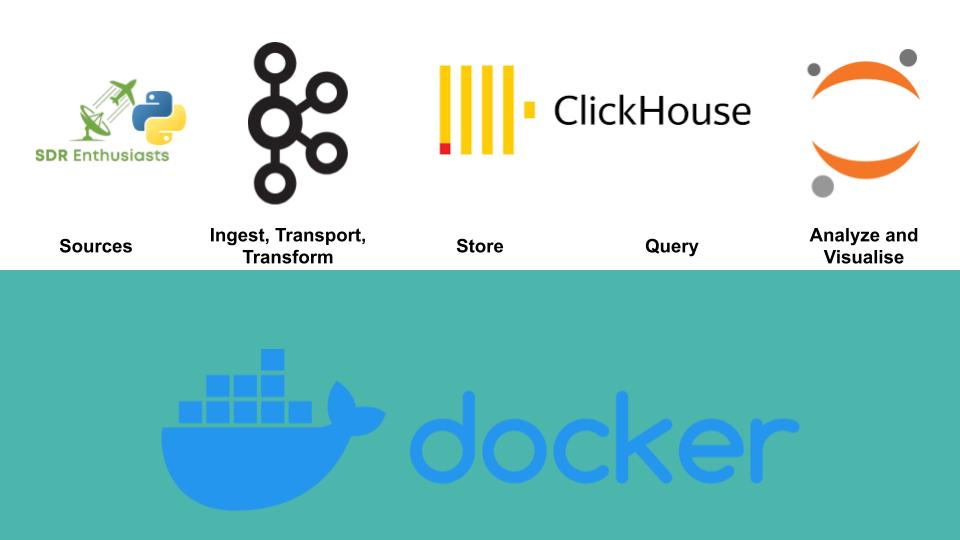
Your pipeline now processes ADS-B data through several stages: ultrafeeder receives radio signals and outputs ADS-B data, our adsb-kafka-connector service parses messages into structured JSON, and the Kafka broker stores and distributes the structured aircraft data.
Each message in Kafka now looks like:
{
  "timestamp": "2025-06-01T17:42:30.733",
  "raw_message": "MSG,3,1,1,40756A,1,..."
}
In building this pipeline you should now have learned the basics of deploying Apache Kafka and producing data to it that I hope will be useful to you in your future projects, if you build anything with this data or with this project please let me know! I'd love to see what you get up to.
For the full code used to build this project check out the project on my GitHub. It is worth noting that whilst this project is a good place to get started with Kafka it is not yet production ready, further refinement is needed to make this project properly secure (like removing plaintext secrets in favour of proper secrets management).
This structured ADS-B data is now ready for real-time analytics, I plan on covering how you can do this with ClickHouse and Grafana in a future article. I've spoken before about analysing ADS-B with Apache Druid and Grafana at the Aerospike Barcelona Data Management Community Meetup and you can find a recording of my talk here.
Further Reading
The 1090 Megahertz Riddle (second edition) A Guide to Decoding Mode S and ADS-B Signals by Junzi Sun
My Python/Java/Spring/Go/Whatever Client Won’t Connect to My Apache Kafka Cluster in Docker/AWS/My Brother’s Laptop. Please Help! A really helpful guide to troubleshooting Kafka connectivity issues by Robin Moffatt